
 In line work a requirement is to be able to climb poles. The better you become at climbing poles, the easier your work will be. Yet, no matter how good you become at climbing, the potential for a serious accident always exists when you work around high voltage. In this section you will look at the proper methods of maintaining equipment, climbing poles, and performing emergency rescue from the pole and aerial bucket truck.
A lineman climbing a pole corresponds to an office worker taking an elevator to the top floor of a building to his or her office. Climbing is not the job, but you must learn to climb and be at ease when you get there.
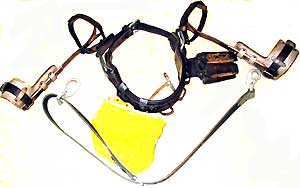
To climb a wooden pole or tree, you will use the equipment shown in figure above.
On the climber, the stirrup fits under the arch of your foot, and the leg iron runs up the inner side of the calf of your leg. This puts the gaff in a position on the inner side of your foot where you can drive it into the pole or tree as you climb.

Two leather straps run through the loop straps and hold the climber tightly against your calf and ankle. The leather pad keeps the upper end of the climber from digging into your leg. The term leather refers not only to treated animal hides but also to neoprene-impregnated nylon products, such as body belts, safety straps, and leg straps. These nonleather items are cleaned with soap and water and are available to the battalions. The safety strap and body belt, are what might be called your extra pair of hands when you work aloft. The safety strap is a leather belt with a tongue type of buckle (keeper snap) at each end. The body belt, strapped around your waist, contains various pockets for small tools. While climbing, you will have the safety strap hanging by both ends from the left ring (called a D ring because of its shape) on the body belt.
The safety strap also has an adjustable buckle that permits varying the length to suit the lineman and circumference of the pole. Care of Climbing Equipment To a lineman the term burning a pole means the highly unpleasant experience of sliding all the way, or a good part of the way, down a pole as a result of defective equipment or some error in climbing techniques made on the way up. The burning you receive does not need to be explained in detail, and besides burning, you may get many splinters. However, climbers, body belt, and safety strap should keep you up where you belong—if you use them properly and take proper care of them. The body belt and safety strap require continuous inspection. Look for the following: Loose or broken rivets - Cracks, cuts, nicks, or tears in leather - Broken or otherwise defective buckles - Defects in safety-belt snap hooks and body-belt D rings - Worn leather - Enlarged tongue holes for belt buckles
If you discover any of these defects, turn in the equipment and replace it. You must periodically perform maintenance work on the leather parts of your climbing equipment. Cleaning comes first. Use a damp sponge and a mild soap. Work up a thick, creamy lather. Then wash the soap off and wipe the belt with a dry cloth. Next, to make the genuine leather soft and pliable, lather well with saddle soap. Work the lather into all parts; then place the belt in the shade to dry. After the lather has nearly dried, rub down the leather with a soft cloth. Both belts and safety straps, made of genuine leather, require oiling about every 6 months. Be sure the leather is clean before applying oil. Use about 2 teaspoonfuls of neat’s-foot oil, working the oil in gradually. Place the belt in a shady place and allow it to dry for 24 hours. Then rub it down with a soft cloth. Always, before you climb a pole or tree, inspect the climbers for the following defects: Broken or loose straps Stirrup worn to a thickness of one-eighth inch or less Length of pole gaff of less than one-fourth inch as measured along the inner surface Length of tree gaff of less than 5 1/2 inches as measured along the outer surface and of less than 3 1/2 inches along the inner surface Difference in gaff lengths of more than one- eighth inch If you find any of these defects, turn in your climbers for a new pair. Climber's Gauge To minimize certain dangers that can occur from neglect of the climbers, make sure you check your gaffs frequently, using a climber's gauge.
 This gauge is used to check the dimensions of the gaffs. These must be within certain tolerances or the climber will "cut out" or lose contact with a pole or tree. Measurements of the length, width, and thickness of the gaffs are made as follows:
LENGTH. Place the lined face of the gauge against the inner surface of the gaff, with the short edge of the gauge held tightly against the crotch (fig. , view A). The crotch is the point where the gaff joins the leg iron of the climber. lf the point of the gaff extends to or beyond the short reference line, the length of the gaff is satisfactory.

WIDTH. Insert the gaff as far as possible through the small slot marked "W," with the inner surface of the gaff resting against the lined face of the gauge (fig. , view B). If the point of the gaff does not extend beyond the long reference line, the width of this section of the gaff is satisfactory. Insert the gaff as far as possible through the large slot marked "W," with the inner surface of the gaff toward the lined face of the gauge (fig. , view C). If the point of the gaff does not extend beyond the far edge of the gauge, the width of this section of the gaff is satisfactory.
THICKNESS. Insert the gaff as far as possible through the small opening marked "TH," with the inner surface of the gaff resting against the lined face of the gauge. If the point of the gaff does not extend beyond the reference line, the thickness of this section of the gaff is satisfactory. Insert the gaff as far as possible through the large opening marked "TH," with the inner surface of the gaff resting against the lined face of the gauge. If the point of the gaff does not extend beyond the far edge of the gauge, the thickness of this section of the gaff is satisfactory. Sharpen dull gaffs by taking long strokes with a file from the heel to the point of the gaff, removing only enough material to make a good point. NEVER USE A GRINDSTONE OR EMERY WHEEL TO
 SHARPEN GAFFS, since the metal may become overheated and lose its strength (temper). Never sharpen the gaff to a needlepoint since it would sink too deeply into the pole and make climbing difficult. Always leave a shoulder about one-eighth inch back from the point. Remember that climbers are for use on poles ONLY. Do not wear them while working on the ground, and do not use the gaffs for such irregular procedures as the opening of cans. Going Up Before you start to climb a pole, there are a number of preliminary steps that you should take. First, of course, make the preclimb inspection of equipment previously described AND PUT ON YOUR HARD HAT.
Then inspect the pole to determine the best side on which to start. This is usually the back, or high side. Get against the pole and grasp each side of it with your hands—not that you will hand support your weight in climbing, but simply because you will use your hands to help in balancing yourself on the climbers. To learn pole climbing, you must practice actual pole climbing. Some pointers that will help you become proficient in pole climbing in minimum time are as follows: Raise your right leg about 8 inches off the ground and sink the gaff on that leg into the pole. Do not jab the gaff in the wood. Allow your weight to sink it in. Now, swing yourself up off the ground and lock your right leg in a stiff-legged position so that all your weight is supported on that leg. At the next step, raise your left foot about 8 inches and sink the gaff on that foot into the wood.
Then swing up onto the left leg, stiff-legged, and take the next step similarly with the right foot. Continue this stepping up and locking stiff-legged until you reach working position.

Keep the upper-part of your body away from the pole; if you were to "hug" the pole, you would tend to throw the gaffs out of the wood When you reach the working position, proceed immediately with great care to attach the safety strap. You should place your feet so that most of the weight is on the right foot, with the right knee locked. The left foot should be slightly above the right foot and the left leg should be slightly bent. Crook your right arm around the pole. Use your left hand to unsnap one end of the safety strap from the left D-ring on the body belt. Holding the end of the safety strap in your left hand, pass it around the back of the pole. Transfer the end of the safety strap from the left hand to the right hand; at the same time, crook your left arm around the pole to hold yourself in position. Then swing the end of the safety strap quickly around with your right hand and snap it onto the right D-ring on the body belt. 4-41
 WARNING Visually check to ensure that the snap hook on the safety strap is hooked on the D-ring and that the keepers on the snap hooks on both ends of the strap are facing away from your body. When you are sure the strap is secure, you may slowly lean back against the safety strap. Coming Down Before starting down the pole, you must release the body belt. Crook your left arm around the pole, and unhook the safety strap from the right D-ring with the right hand. Pass the end of the safety strap to the left hand, crook your right arm around the pole, and snap the end of the safety strap to the left D-ring You are now ready to descend. Break out the left gaff by swinging the left knee out from the side of the pole. Step down with the left foot to a point about 12 inches below the right; stiff-leg the left leg, and bring your weight on it to sink the gaff. Then break out the right gaff by swinging the right knee away from the pole and proceed as formerly with the left leg. Continue this stepping-down process until you have reached the ground. Safety in Pole Climbing Never climb an erected pole until it has been plumbed, backfilled, and tamped. Before going aloft on an old pole, perform a butt rot test on the pole to assure yourself that the pole is strong enough to withstand your weight, and then carefully perform the previously described inspection of the body belt, safety strap, climbers, and other equipment. The body belt contains pockets for small tools. Keeping the tools in these pockets is important. Never use the center loop in the body belt for carrying a tool, however. In case of a fall, the tool may injure your tailbone. If you try to climb with tools in your hands, your own balance on the pole will be unsafe, and you could drop tools on someone below. The safety strap is used to secure you to the pole, leaving your hands free to work. As you go up, the safety strap is always fastened to a single D-ring on the body belt. For a right-handed person, it is carried on the left D-ring. Never use an improvised safety strap, or one that has been lengthened by the addition of rope or wire. Never attach the strap to pins or to crossarm braces. Never put the safety strap around the pole above the highest crossarm if the length of the pole above the crossarm is short. The strap should never be less than 1 foot below the top of the pole. Never wear climbers except for climbing. Be careful not to gaff yourself or anybody else.
or she
ensure
Never
one mended with
performing
PROVIDE FOR PERSONAL PROTECTION.


Nice articles and your information valuable and good articles thanks for the sharing information Safety body belt for pets
ReplyDelete