
Safety and Health Topics
Combustible Dust
In Focus
Hot Topics - 2008 Fact Sheet, Poster, and Other Products
Any combustible material (and some materials normally considered noncombustible) can burn rapidly when in a finely divided form. If such a dust is suspended in air in the right concentration, it can become explosive. The force from such an explosion can cause employee deaths, injuries, and destruction of entire buildings. Such incidents have killed scores of employees and injured hundreds over the past few decades.
Materials that may form combustible dust include metals (such as aluminum and magnesium), wood, coal, plastics, biosolids, sugar, paper, soap, dried blood, and certain textiles. In many accidents, employers and employees were unaware that a hazard even existed.
A combustible dust explosion hazard may exist in a variety of industries, including: food (e.g., candy, sugar, spice, starch, flour, feed), grain, tobacco, plastics, wood, paper, pulp, rubber, furniture, textiles, pesticides, pharmaceuticals, dyes, coal, metals (e.g., aluminum, chromium, iron, magnesium, and zinc), and fossil fuel power generation.
The following questions link to information relevant to combustible dust in the workplace.
Standards What standards apply?
OSHA | National Consensus
Additional Information What additional information is available?
Related Safety and Health Topics Pages | Other Resources
In Focus
Hot Topics
* Status Report on Combustible Dust --- National Emphasis Program. OSHA, (2009, October). Also available as a 68 KB PDF, 12 pages.
* Hazard Communication Guidance for Combustible Dusts. OSHA Publication 3371-08, (2009).
* Combustible Dust. OSHA Prerule Stage. OSHA is considering rulemaking to develop a combustible dust standard for general industry.
* Combustible Dust --- Does your company or firm process any of these products or materials in powdered form? OSHA Poster, (2008), 35 KB PDF*, 1 page.
* OSHA Reissues its Combustible Dust National Emphasis Program. OSHA Trade News Release, (2008, March 12).
o Combustible Dust National Emphasis Program. OSHA Directive CPL 03-00-008, (2008, March 11).
* Hazard Alert: Combustible Dust Explosions. OSHA Fact Sheet, (2008, March), 790 KB PDF*, 2 pages.
* Combustible Dust in Industry: Preventing and Mitigating the Effects of Fire and Explosion. OSHA Safety and Health Information Bulletin (SHIB) 07-31-2005, (2005, July 31). Also available as a 21 KB PDF, 9 pages.
Friday, November 6, 2009
Wednesday, October 14, 2009
Powered Industrial Trucks (Forklift) eTool
Powered Industrial Trucks (Forklift)
Types and Fundamentals
Operating the Forklift
Understanding the Workplace
Training Assistance
Powered industrial trucks, commonly called forklifts or lift trucks, are used in many industries, primarily to move materials. They can be used to move, raise, lower, or remove large objects or a number of smaller objects on pallets or in boxes, crates, or other containers.
The hazards commonly associated with powered industrial trucks vary depending on the vehicle types and the workplace where the truck is used. Each type of truck presents different operating hazards. For example, a sit-down, counterbalanced high lift rider truck is more likely than a motorized hand truck to be involved in a falling load accident, because the sit-down rider truck can lift a load much higher than a hand truck. Workplace conditions also present different hazards. For example, retail establishments often face greater challenges than other worksites in maintaining pedestrian safety.
The best way to protect employees from injury also depends on the type of truck operated and work site where it is being used. This eTool* specifically provides information on OSHA's Powered Industrial Truck requirements [29 CFR 1910.178] and industry best practices addressing:
* Types and Fundamentals
The differing types and fundamentals of powered trucks
* Operating the Forklift
The basic operating rules and safe work practices
* Understanding the Workplace
How workplace conditions can affect safe operation
* Training Assistance
Operator training required by OSHA
Note: This eTool is intended as a resource for providing training under OSHA's Powered Industrial Truck standard. This eTool focuses on powered industrial trucks commonly used in general industry. It is not a substitute for any of the provisions of the Occupational Safety and Health Act of 1970, for the powered industrial truck standard, or for any other OSHA standards. It is also not a substitute for a powered industrial truck operator training program.
It is a violation of Federal law for anyone UNDER 18 years of age to operate a forklift or for anyone OVER 18 years of age who is not properly trained and certified to do so.
It is a violation of Federal law for anyone
UNDER 18 years of age to operate a forklift
or for anyone OVER 18 years of age who is not properly trained and certified to do so. [More...]
*eTools are "stand-alone", interactive, Web-based training tools on occupational safety and health topics. They utilize graphical menus as well as expert system modules. As indicated in the disclaimer, eTools do not create new OSHA requirements.
www.osha.gov/dcsp/products/etools/pit/index.html
Monday, September 28, 2009
Training Requirements in OSHA Standards and Training Guidelines
U.S. Department of Labor
Alexis M. Herman, Secretary
Occupational Safety and Health Administration
Charles N. Jeffress, Assistant Secretary
www.osha.gov/Publications/osha2254.pdf
Alexis M. Herman, Secretary
Occupational Safety and Health Administration
Charles N. Jeffress, Assistant Secretary
www.osha.gov/Publications/osha2254.pdf
Monday, September 21, 2009
The Correct Lockout/Tagout Procedure to Follow Prior to Servicing or Maintenance
Each machine or piece of equipment requires specific procedures for lockout and
should be included in your operator’s manual. However, the following will provide
you with the generally accepted sequence.
1. Notify employees when servicing or maintenance is required on a machine
or equipment
2. The authorized employee must identify the type and magnitude of the
machine’s energy, understand its hazards and know how to control it
3. Shut the machine down by normal stopping procedures (depress STOP
button, open switch, close valve, etc)
4. Deactivate the energy isolating device(s) so the machine is isolated from
the energy source(s)
5. Lock out the energy isolating device(s) with assigned individual locks
6. Stored or residual energy (such as that in capacitors, springs, rotating
flywheels, hydraulic systems, and air, gas, steam or water pressure, etc.)
must be dissipated or restrained by methods such as grounding,
repositioning, blocking, bleeding down, etc
7. Ensure the equipment is disconnected from the energy source(s) by first checking that no personnel
are exposed. Then verify the isolation of the equipment by operating the push buttons or other normal
operating controls or by testing to make sure the equipment will not operate
8. The machine or equipment is now locked out.
Thursday, September 10, 2009
Key Facts about Swine Influenza (Swine Flu)
Questions & Answers
What is Swine Influenza?
For information about 2009 H1N1 flu, visit www.cdc.gov/h1n1flu
Swine Influenza (swine flu) is a respiratory disease of pigs caused by type A influenza virus that regularly causes outbreaks of influenza in pigs. Swine flu viruses cause high levels of illness and low death rates in pigs. Swine influenza viruses may circulate among swine throughout the year, but most outbreaks occur during the late fall and winter months similar to outbreaks in humans. The classical swine flu virus (an influenza type A H1N1 virus) was first isolated from a pig in 1930.
How many swine flu viruses are there?
Like all influenza viruses, swine flu viruses change constantly. Pigs can be infected by avian influenza and human influenza viruses as well as swine influenza viruses. When influenza viruses from different species infect pigs, the viruses can reassort (i.e. swap genes) and new viruses that are a mix of swine, human and/or avian influenza viruses can emerge. Over the years, different variations of swine flu viruses have emerged. At this time, there are four main influenza type A virus subtypes that have been isolated in pigs: H1N1, H1N2, H3N2, and H3N1. However, most of the recently isolated influenza viruses from pigs have been H1N1 viruses.
Swine Flu in Humans
Can humans catch swine flu?
Swine flu viruses do not normally infect humans. However, sporadic human infections with swine flu have occurred. Most commonly, these cases occur in persons with direct exposure to pigs (e.g. children near pigs at a fair or workers in the swine industry). In addition, there have been documented cases of one person spreading swine flu to others. For example, an outbreak of apparent swine flu infection in pigs in Wisconsin in 1988 resulted in multiple human infections, and, although no community outbreak resulted, there was antibody evidence of virus transmission from the patient to health care workers who had close contact with the patient.
How common is swine flu infection in humans?
In the past, CDC received reports of approximately one human swine influenza virus infection every one to two years in the U.S., but from December 2005 through February 2009, 12 cases of human infection with swine influenza have been reported.
What are the symptoms of swine flu in humans?
The symptoms of swine flu in people are expected to be similar to the symptoms of regular human seasonal influenza and include fever, lethargy, lack of appetite and coughing. Some people with swine flu also have reported runny nose, sore throat, nausea, vomiting and diarrhea.
Can people catch swine flu from eating pork?
No. Swine influenza viruses are not transmitted by food. You can not get swine influenza from eating pork or pork products. Eating properly handled and cooked pork and pork products is safe. Cooking pork to an internal temperature of 160°F kills the swine flu virus as it does other bacteria and viruses.
How does swine flu spread?
Influenza viruses can be directly transmitted from pigs to people and from people to pigs. Human infection with flu viruses from pigs are most likely to occur when people are in close proximity to infected pigs, such as in pig barns and livestock exhibits housing pigs at fairs. Human-to-human transmission of swine flu can also occur. This is thought to occur in the same way as seasonal flu occurs in people, which is mainly person-to-person transmission through coughing or sneezing of people infected with the influenza virus. People may become infected by touching something with flu viruses on it and then touching their mouth or nose.
What do we know about human-to-human spread of swine flu?
In September 1988, a previously healthy 32-year-old pregnant woman was hospitalized for pneumonia and died 8 days later. A swine H1N1 flu virus was detected. Four days before getting sick, the patient visited a county fair swine exhibition where there was widespread influenza-like illness among the swine.
In follow-up studies, 76% of swine exhibitors tested had antibody evidence of swine flu infection but no serious illnesses were detected among this group. Additional studies suggest that one to three health care personnel who had contact with the patient developed mild influenza-like illnesses with antibody evidence of swine flu infection.
How can human infections with swine influenza be diagnosed?
To diagnose swine influenza A infection, a respiratory specimen would generally need to be collected within the first 4 to 5 days of illness (when an infected person is most likely to be shedding virus). However, some persons, especially children, may shed virus for 10 days or longer. Identification as a swine flu influenza A virus requires sending the specimen to CDC for laboratory testing.
What medications are available to treat swine flu infections in humans?
There are four different antiviral drugs that are licensed for use in the US for the treatment of influenza: amantadine, rimantadine, oseltamivir and zanamivir. While most swine influenza viruses have been susceptible to all four drugs, the most recent seven swine influenza viruses isolated from humans are resistant to amantadine and rimantadine. At this time, CDC recommends the use of oseltamivir or zanamivir for the treatment and/or prevention of infection with swine influenza viruses. More information on treatment recommendations can be found at www.cdc.gov/flu/swineflu/recommendations.htm.
What other examples of swine flu outbreaks are there?
Probably the most well known is an outbreak of swine flu among soldiers in Fort Dix, New Jersey in 1976. The virus caused disease with x-ray evidence of pneumonia in at least 4 soldiers and 1 death; all of these patients had previously been healthy. The virus was transmitted to close contacts in a basic training environment, with limited transmission outside the basic training group. The virus is thought to have circulated for a month and disappeared. The source of the virus, the exact time of its introduction into Fort Dix, and factors limiting its spread and duration are unknown. The Fort Dix outbreak may have been caused by introduction of an animal virus into a stressed human population in close contact in crowded facilities during the winter. The swine influenza A virus collected from a Fort Dix soldier was named A/New Jersey/76 (Hsw1N1).
For information about 2009 H1N1 flu, visit http://www.cdc.gov/h1n1flu/
Is the H1N1 swine flu virus the same as human H1N1 viruses?
No. The H1N1 swine flu viruses are antigenically very different from human H1N1 viruses and, therefore, vaccines for human seasonal flu would not provide protection from H1N1 swine flu viruses.
Swine Flu in Pigs
How does swine flu spread among pigs?
Swine flu viruses are thought to be spread mostly through close contact among pigs and possibly from contaminated objects moving between infected and uninfected pigs. Herds with continuous swine flu infections and herds that are vaccinated against swine flu may have sporadic disease, or may show only mild or no symptoms of infection.
What are signs of swine flu in pigs?
Signs of swine flu in pigs can include sudden onset of fever, depression, coughing (barking), discharge from the nose or eyes, sneezing, breathing difficulties, eye redness or inflammation, and going off feed.
How common is swine flu among pigs?
H1N1 and H3N2 swine flu viruses are endemic among pig populations in the United States and something that the industry deals with routinely. Outbreaks among pigs normally occur in colder weather months (late fall and winter) and sometimes with the introduction of new pigs into susceptible herds. Studies have shown that the swine flu H1N1 is common throughout pig populations worldwide, with 25 percent of animals showing antibody evidence of infection. In the U.S. studies have shown that 30 percent of the pig population has antibody evidence of having had H1N1 infection. More specifically, 51 percent of pigs in the north-central U.S. have been shown to have antibody evidence of infection with swine H1N1. Human infections with swine flu H1N1 viruses are rare. There is currently no way to differentiate antibody produced in response to flu vaccination in pigs from antibody made in response to pig infections with swine H1N1 influenza.
While H1N1 swine viruses have been known to circulate among pig populations since at least 1930, H3N2 influenza viruses did not begin circulating among US pigs until 1998. The H3N2 viruses initially were introduced into the pig population from humans. The current swine flu H3N2 viruses are closely related to human H3N2 viruses.
Is there a vaccine for swine flu?
Vaccines are available to be given to pigs to prevent swine influenza. There is no vaccine to protect humans from swine flu. The seasonal influenza vaccine will likely help provide partial protection against swine H3N2, but not swine H1N1 viruses.
Tuesday, September 8, 2009
Tuesday, September 1, 2009
Monday, August 17, 2009

Monday, August 3, 2009
Friday, July 31, 2009
Insect and Spider Bites
Each year many workers experience insect and spider bites serious enough to make them lose time off the job.
If you are stung by a bee, remove the stinger gently (with tweezers, if possible) and avoid squeezing the poison sac. Apply an ice pack or a cloth dipped in cold water to reduce swelling and itching. A sting from a yellow jacket can be deadly. These insects feed on dead animals and can cause blood poisoning. If you have an allergic reaction to a bite, get medical help immediately.
Of spiders causing serious medical problems only the black widow and brown recluse are considered serious threats. The black widow has a shiny black body, about the size of a pea. With legs extended, it’s about an inch long. Females have a red or yellow hourglass mark on their underside. The black widow spider is partial to outdoor latrines and other places that attract flies. The black widow spider will attack with even the slightest provocation. Its bite is less painful than a pinprick, and does not cause a hole in the skin, but soon, intense pain and stiffness set in. Symptoms also may include fever, nausea, abdominal pain and chills. For children and the elderly, black widow bites can be lethal.
Also beware of the brown recluse spider. When it comes to insect bites, the bite of the brown recluse spider is one of the most feared. This yellowish-tan to dark brown spider is 1/4-1/2 inch long. It has a characteristic fiddle-shaped mark on its upper body. Its bite can have painful, disfiguring, and even deadly results. Within hours of a bite, victims may suffer severe pain and stiffness, fever, weakness, vomiting or a rash. The recluse’s venom destroys cells and clots blood, blocking blood vessels and leading to gangrene. Within 24 hours, the wound erupts into an open sore ranging from the size of a thumbnail to that of an adult’s hand. Anyone bitten by either spider should seek medical help immediately.
Experts say, spiders typically don’t go looking for human prey. Spiders are generally shy and try to avoid contact with humans. Leave them to their dark, secluded spaces – under rocks, in debris piles, sheds, closets and attics, and there’s no worry. Invade their space, though, and risk a bite. Spiders will attack if trapped or if pressed against the skin.
Not all people react the same way to these spider bites. The variation may be due to the amount of venom injected or the person’s physiology or immune system. The first line of treatment, if you suspect a bite is to apply a cold compress. However, if you have a bite and experience other side effects, get medical treatment immediately.
The above evaluations and/or recommendations are for general guidance only and should not be relied upon for legal compliance purposes. They are based solely on the information provided to us and relate only to those conditions specifically discussed. We do not make any warranty, expressed or implied, that your workplace is safe or healthful or that it complies with all laws, regulations or standards.
Wednesday, July 22, 2009
Monday, July 20, 2009

Wednesday, July 15, 2009
A little help to check if you job site is safe!
Company:__________________________Work Area:________________
Inspected by:_______________________________ Date of Inspection:___________________
WORK AREA SAFETY CHECKLIST
General Work Environment - Answer to each question: Yes No
Work sites clean and orderly? ___ __
Work surfaces kept dry or appropriate means taken to assure the surfaces are slip-resistant? ___ __
All spilled materials or liquids cleaned up immediately? ___ __
Combustible scrap, debris and waste stored safely and removed from the work site promptly? ___ __
Accumulations of combustible dust routinely removed from elevated surfaces including the overhead structure of the buildings? ___ __
Combustible dust cleaned up with a vacuum system to prevent the dust going into suspension? ___ __
Metallic or conductive dust prevented from entering or accumulating on or around electrical enclosures or equipment? ___ __
Covered metal waste cans used for oily and paint soaked waste? ___ __
Oil and gas fired devices equipped with flame failure controls that will prevent flow of fuel if pilots or main burners are not working? ___ __
At least minimum number of toilets and washing facilities provided? ___ __
Toilets and washing facilities clean and sanitary? ___ __
Work areas adequately illuminated? ___ __
Pits and floor openings covered or otherwise guarded? ___ __
Exiting or Egress - Answer to each question: Yes No
All exits marked with an exit sign and illuminated by a reliable light source? ___ __
Are the directions to exits, when not immediately apparent, marked with visible signs? ___ __
Doors, passageways or stairways, that are neither exits nor access to exits and which could be mistaken for exits, appropriately marked "NOT AN EXIT", etc. ___ __
Exit signs provided with the word "EXIT" in lettering at least 5 inches high and the stroke of the lettering at least 1/2 inch wide? ___ __
Exit doors side-hinged? ___ __
All exits kept free of obstructions? ___ __
At least two means of egress provided from elevated platforms, pits or rooms where the absence of a second exit would increase the risk of injury? ___ __
Sufficient exits to permit prompt escape in case of an emergency? ___ __
Special precautions taken to protect employees during construction and repair operations? ___ __
Is the number of exits from each floor of a building and the number of exits from the building itself appropriate for the building occupancy load? ___ __
Exits stairways that are required to be separated from other parts of a building enclosed by at least two-hour, fire-resistive construction in buildings more than four stories high, and not less than one-hour fire resistive construction elsewhere? ___ __
When ramps are used as part of required exiting from a building, is the ramp slope limited to 1 foot vertical to 12 feet horizontal? ___ __
When an exit must be made through an unframed glass door, glass exit door, etc. are the doors fully tempered and do they meet the safety requirements for human impact? ___ __
Exit Doors - Answer to each question: Yes No
Doors that are required to serve as exits designed and constructed so that the way of exit travel is obvious and direct? ___ __
Windows that could be mistaken for exit doors made inaccessible by means of barriers or railing? ___ __
Exit doors able to open from the direction of exit travel without the use of a key or any special knowledge or effort when the building is occupied? ___ __
Are revolving, sliding, or overhead doors prohibited from serving as a require exit door? ___ __
Where hardware installed on a required exit door allow the door to open by applying a force of 15 pounds or less in the direction of the exit traffic? ___ __
Doors on cold storage rooms provided with an inside release mechanism that will release the latch and open the door even if it's padlocked or otherwise locked on the outside? ___ __
When exits doors open directly onto any street, alley, or other area where vehicles may be operated, are barriers and warning provided to prevent employees from stepping into the path of traffic? ___ __
Are there viewing panels in doors that swing in both directions and are located between rooms where there is frequent traffic? ___ __
Portable Ladders - Answer to each question: Yes No
Ladders maintained in good condition, joints between steps and side rails tight, all hardware and fittings securely attached and movable parts operating freely without binding or undue play? ___ __
Non slip safety feet provided on each metal or rung ladder? ___ __
Ladder rungs and steps free of grease and oil? ___ __
Is it prohibited to place a ladder in front of door openings towards the ladder except when the door is blocked open, locked or other wise guarded? ___ __
Is it prohibited to place ladders on boxes, barrels or other unstable bases to obtain additional height? ___ __
Are employees instructed to face the ladder when ascending or descending? ___ __
Employees prohibited from using ladders that are broken, missing steps, rungs, or cleats, have broken side rails, or from using other faulty equipment? ___ __
Employees instructed not to use the top step of ordinary stepladders as a step? ___ __
When portable rung ladders are used to gain access to elevated platforms, roof, etc., does the ladder always extend at least 3 feet above the elevated surface? ___ __
When portable rung or cleat ladders are used, is it required the base places so that slipping will not occur or it is lashed or other wise held in place? ___ __
Portable metal ladders legibly marked with signs reading "CAUTION: Do not use around electrical equipment" or equivalent wording? ___ __
Employees prohibited from using ladders as guys, braces, skids, gin poles, or for other than their intended purposes? ___ __
Employees instructed to adjust extension ladders only while standing at the base, not while standing on the ladder or any position above the ladder? ___ __
Walkways - Answer to each question: Yes No
Aisles and passageways kept clear? ___ __
Aisles and walkways marked as appropriate? ___ __
Wet surfaces covered with non-slip materials? ___ __
Holes in the floor, sidewalk or other walking surfaces repaired properly, covered or other wise made safe? ___ __
Are there safe clearance for walking in aisles where motorized or mechanical handling equipment is operating? ___ __
Materials or equipment stored in such a way that sharp projectiles will not interfere with the walkway? ___ __
Spilled materials cleaned up immediately? ___ __
Changes of direction or elevations readily identifiable? ___ __
Aisles or walkways that pass near moving or operating machinery, welding operations or similar operations arranged so employees will not be subjected to potential hazards? ___ __
Adequate headroom provided for the entire length of any aisle or walkway? ___ __
Standard guardrails provided wherever aisle or walkway surfaces are elevated more than 30 inches above any adjacent floor or the ground? ___ __
Bridges provided over conveyors and similar hazards equipped with proper railing? ___ __
Floor and Wall Openings - Answer to each question: Yes No
Floor openings guarded by a cover, guardrail or equivalent on all sides (except entrance to stairways or ladders)? ___ __
Toe boards installed around the edges of permanent floor openings? ___ __
Skylight screens of such construction and mounting that they will with stand a load of at least 200 lbs. ___ __
Glass in windows, doors, glass walls, etc. which are subject to human impact of sufficient thickness and type for the condition of use? ___ __
Grates or similar type covers over floor openings, such as floor drains, of such design that foot traffic or rolling equipment will not be affected by the grate spacing? ___ __
Unused portions of service pits and pits not actually in use either covered or protected by guardrails or equivalent? ___ __
Manhole covers, trench covers and similar covers, plus their supports, designed to carry a truck rear axle load of at least 20,000 pounds when located in roadways and subject to vehicle traffic. ___ __
Floor or wall openings in fire resistive construction provided with doors or covers compatible with the fire rating of the structure and provided with a self closing feature when appropriate? ___ __
Stairs and Stairways - Answer to each question: Yes No
Standard stair rails or handrails on all stairways having four or more risers? ___ __
Stairways at least 22 inches wide? ___ __
Stairs have at least 6'6" clearance? ___ __
Stairs angle no more than 50 and no less than 30 degrees? ___ __
Stairs of hollow pan type treads and landing filled with solid material? ___ __
Steps on stairs and stairways designed or provided with a surface that renders them slip resistant? ___ __
Stairway handrails located between 30 and 34 inches above the leading edge of stair treads? ___ __
Stairway handrails have at least 1 and 1/2 inches of clearance between the handrails and the wall or surface they are mounted on? ___ __
Stairway handrails capable of withstanding a load of 200 pounds, applied in any direction? ___ __
Where stairs or stairways exit directly into any area where vehicles may be operated, are adequate barriers and warnings provided to prevent employees from steeping into the path of traffic? ___ __
Stairway landings have a dimension measured in the direction of travel, at least equal to the width of the stairway? ___ __
Vertical distance between stairway landings limited to 12 feet or less? ___ __
Stairway provided to the roof or each building 4 or more stories in height, provided the roof slope has a 4 inch drop in 12 inches or less? ___ __
Elevated Surfaces - Answer to each question: Yes No
Signs posted, when appropriate, showing the elevated surface load capacity? ___ __
Surfaces elevated more than 30 inches above the floor or ground provided with standard guardrails? ___ __
Elevated surfaces (beneath which people or machinery could be exposed to falling objects) provided with standard four inch toe boards? ___ __
Permanent means of access and egress provided to elevated storage and work surfaces? ___ __
Required headroom provided where necessary? ___ __
Material on elevated surfaces piled, stacked or racked in a manner to prevent it from tipping, falling, collapsing, rolling or spreading? ___ __
Dock boards or bridge plates used when transferring materials between docks and trucks or rail cars? ___ __
Monday, July 13, 2009

Friday, July 10, 2009
Wednesday, July 8, 2009
Monday, July 6, 2009

Wednesday, June 24, 2009

Tuesday, June 9, 2009

Monday, June 8, 2009

Safe Food Handling
Preparing for a Weather Emergency
Severe weather events can mean power outages, floods, and other problems that can affect the safety of food. Knowing what to do before and after a weather event can help you reduce your risk of illness. By following these guidelines, you can also minimize the amount of food that may be lost due to spoilage.
Especially in storm - prone areas, power outages can be a common problem. Power outages can occur at any time of the year and it may take from a few hours to several days for electricity to be restored to residential areas. Without electricity or a cold source, food stored in refrigerators and freezers can become unsafe. Bacteria in food grow rapidly at temperatures between 40 and 140 °F, and if these foods are consumed, people can become very sick.
Steps to follow to prepare for a possible weather emergency
* Keep an appliance thermometer in the refrigerator and freezer. An appliance thermometer indicates the temperature in the refrigerator and freezer. In the case of a power outage, it can help determine the safety of the food.
* Make sure the freezer is at 0 °F or below and the refrigerator is at 40 °F or below.
* Freeze containers of water ahead of time for ice to help keep food cold in the freezer, refrigerator, or coolers after the power is out. Freeze gel packs for use in coolers.
* Freeze refrigerated items such as leftovers, milk and fresh meat and poultry that you may not need immediately — this helps keep them at a safe temperature longer.
* Plan ahead and know where dry ice and block ice can be purchased.
* Have coolers on hand to keep refrigerated food cold if the power will be out for more than 4 hours.
* Group food together in the freezer - this helps the food stay cold longer.
* Store food on shelves that will be safely out of the way of contaminated water in case of flooding.
Steps to follow after the weather emergency
* Keep the refrigerator and freezer doors closed as much as possible to maintain the cold temperature.
* The refrigerator will keep food safe for about 4 hours if it is unopened. A full freezer will hold the temperature for approximately 48 hours (24 hours if it is half full) and the door remains closed.
* Discard refrigerated perishable food such as meat, poultry, fish, soft cheeses, milk, eggs, leftovers, and deli items after 4 hours without power.
* Food may be safely refrozen if it still contains ice crystals or is at 40 °F or below when checked with a food thermometer.
* Never taste a food to determine its safety!
* Obtain dry or block ice to keep your refrigerator and freezer as cold as possible if the power is going to be out for a prolonged period of time. Fifty pounds of dry ice should hold an 18-cubic-foot full freezer for 2 days.
* If the power has been out for several days, check the temperature of the freezer with an appliance thermometer. If the appliance thermometer reads 40 °F or below, the food is safe to refreeze.
* If a thermometer has not been kept in the freezer, check each package of food to determine its safety. If the food still contains ice crystals, the food is safe.
If Flooding Occurs
* Drink only bottled water that has not come in contact with flood water. Discard any bottled water that may have come in contact with flood water.
* Discard any food that is not in a waterproof container if there is any chance it may have come in contact with flood water. Food containers that are not waterproof include those with screw-caps, snap lids, pull tops, and crimped caps.
* Discard wooden cutting boards, plastic utensils, baby bottle nipples, and pacifiers that may have come in contact with flood water.
* Undamaged, commercially prepared foods in all-metal cans and retort pouches (for example, flexible, shelf-stable juice or seafood pouches) can be saved. Follow the "Steps to Salvage All-Metal Cans and Retort Pouches" in the publication Keeping Food Safe During an Emergency at: www.fsis.usda.gov/Fact_Sheets/
keeping_food_ Safe_during_an_emergency/index.asp
* Thoroughly wash all metal pans, ceramic dishes, and utensils that came in contact with flood water with hot soapy water. Sanitize by boiling them in clean water or by immersing them for 15 minutes in a solution of 1 tablespoon unscented, liquid chlorine bleach per gallon of drinking water.
To Remove Odors from Refrigerators and Freezers
If food has spoiled in a refrigerator or freezer and odors from the food remain, they may be difficult to remove. The following procedures may help but may have to be repeated several times.
* Dispose of any spoiled or questionable food.
* Remove shelves, crispers, and ice trays. Wash them thoroughly with hot water and detergent. Then rinse with a sanitizing solution (1 tablespoon unscented, liquid chlorine bleach per gallon of water).
* Wash the interior of the refrigerator and freezer, including the door and gasket, with hot water and baking soda. Rinse with sanitizing solution as above.
* Leave the door open for about 15 minutes to allow free air circulation. For more information about removing odors, see www.fsis.usda.gov/PDF/Removing_Odors_from_ Refrigerators_and_Freezers.pdf (PDF Only)
When in Doubt, Throw it Out!
Tuesday, June 2, 2009
Head Protection

 | |||||||
| Assessing the Need for Personal Protective Equipment: A Guide for Employers Small Business Safety Management Series U.S. Department of Labor Occupational Safety and Health Administration OSHA 3151 1997 Head Protection When do my employees need head protection? You must provide head protection for your employees if:
In general, protective helmets, or hard hats, should
| |||||||
| Hard hats require a hard outer shell and a shock-absorbing lining. The lining should incorporate a head band and straps that suspend the shell from 1 to 1 1/4 inches (2.54 cm to 3.18 cm) away from the user's head. This design provides shock absorption during impact and ventilation during wear. As with devices designed to protect eyes, the design, construction, testing, and use of protective helmets must meet standards established by ANSI. Protective helmets purchased after July 5, 1994, must comply with ANSI Z89.1-1986,(7) whereas, those purchased before this date must meet the ANSI Z89.1-1969 standard. | |||||||
| | |||||||
| What types of head protection are available? Hard hats are divided into three industrial classes: Class A. These helmets are for general service. They provide good impact protection but limited voltage protection. They are used mainly in mining, building construction, shipbuilding, lumbering , and manufacturing. Class B. Choose Class B helmets if your employees are engaged in electrical work. They protect a gainst falling objects and high-voltage shock and burns. Class C. Designed for comfort, these light-weight helmets offer limited protection. They protect workers from bumping against fixed objects but do not protect against falling objects or electric shock. Look at the inside of any protective helmet you are considering for your employees, and you should see a label showing the manufacturer's name, the ANSI standard it meets, and its class. Figure 2 shows the basic design of hard hats. | |||||||
| How do I choose the correct protective helmets from among the different types? Each kind of protective helmet is designed to protect against specific hazards. By completing the hazard assessment outlined above, you will identify the specific workplace hazards that pose a threat to your employee's head. I have purchased new hard hats that meet the ANSI requirements. Have I fulfilled my responsibility to protect my employees' heads? No. Issuing appropriate head protection to employees is a major first step, but you must make sure that the hard hats continue to provide sufficient protection to your employees. Do this by training your employees in the proper use and maintenance of hard hats including daily inspection of them. If your employees identify any of the following defects, remove the hard hats from service: The suspension system shows signs of deterioration such as:
The suspension system no longer holds the shell from 1 inch to 1 1/4 inches (2.54cm - 3.18cm) away from the employee's head. The brim or shell is cracked, perforated, or deformed. The brim or shell shows signs of exposure to heat, chemicals, ultraviolet light, or other radiation. Such signs include:
Could employees wearing hard hats and working at elevations create a potential hazard for the employees working below? To protect employees working below, you must provide chin straps for the protective helmets worn by employees working at higher elevations, whether in an aerial lift or at the edge of a pit. The chin straps should be designed to prevent the hard hats from being bumped off the employees' heads. Can I require employees to cut their hair if it is long enough to get tangled in machinery? Long hair (longer than four inches) can be drawn into machine parts such as chains, belts, rotating devices, suction devices, and blowers. Hair may even be drawn into machines otherwise guarded with mesh. Although you need not require your employees to cut their hair, you must require them to cover and protect their hair with bandanas, hair nets, turbans, soft caps, or the like. These items, however, must not themselves present a hazard. Once I have selected helmets to protect my employees' heads, how do I make sure they use them properly? Train your employees to use the hard hats. Checklist D will help you instruct your employees to use and care for the head protection you provide. Click here. How do I make sure that the hard hats I provide will be kept in good condition?
Also, instruct employees to clean the protective helmets periodically by:
 | |||||||
Tuesday, May 26, 2009
From OSHA
| |||||
| |

| | In Focus | | |||
| |||||
It is difficult to predict when the next influenza pandemic will occur or how severe it will be. Wherever and whenever a pandemic starts, everyone around the world is at risk. Countries might, through measures such as border closures and travel restrictions, delay arrival of the virus, but cannot stop it.
During a pandemic, transmission can be anticipated in the workplace, not only from patient to workers in health care settings, but also among co-workers in general work settings. A pandemic would cause high levels of illness, death, social disruption, and economic loss. Everyday life would be disrupted because so many people in so many places become seriously ill at the same time. Impacts could range from school and business closings to the interruption of basic services such as public transportation and food delivery.
Education and outreach are critical to preparing for a pandemic. Understanding what a pandemic is, what needs to be done at all levels to prepare for pandemic influenza, and what could happen during a pandemic helps us make informed decisions both as individuals and as a nation. Should a pandemic occur the public must be able to depend on its government to provide scientifically sound public health information quickly, openly and dependably. For additional information on pandemic influenza, see One-stop access to U.S.government avian and pandemic flu information
Thursday, May 21, 2009
Personal Lightning Safety Tips
1. PLAN in advance your evacuation and safety measures. When you first see lightning or hear thunder, activate your emergency plan. Now is the time to go to a building or a vehicle. Lightning often precedes rain, so don't wait for the rain to begin before suspending activities.
2. IF OUTDOORS...Avoid water. Avoid the high ground. Avoid open spaces. Avoid all metal objects including electric wires, fences, machinery, motors, power tools, etc. Unsafe places include underneath canopies, small picnic or rain shelters, or near trees. Where possible, find shelter in a substantial building or in a fully enclosed metal vehicle such as a car, truck or a van with the windows completely shut. If lightning is striking nearby when you are outside, you should:
A. Crouch down. Put feet together. Place hands over ears to minimize hearing damage from thunder.
B. Avoid proximity (minimum of 15 ft.) to other people.
3. IF INDOORS... Avoid water. Stay away from doors and windows. Do not use the telephone. Take off head sets. Turn off, unplug, and stay away from appliances, computers, power tools, & TV sets. Lightning may strike exterior electric and phone lines, inducing shocks to inside equipment.
4. SUSPEND ACTIVITIES for 30 minutes after the last observed lightning or thunder.
5. INJURED PERSONS do not carry an electrical charge and can be handled safely. Apply First Aid procedures to a lightning victim if you are qualified to do so. Call 911 or send for help immediately.
6. KNOW YOUR EMERGENCY TELEPHONE NUMBERS.
Wednesday, May 13, 2009
POLE CLIMBING AND POLE CLIMBING RESCUE PROCEDURES
 In line work a requirement is to be able to climb poles. The better you become at climbing poles, the easier your work will be. Yet, no matter how good you become at climbing, the potential for a serious accident always exists when you work around high voltage. In this section you will look at the proper methods of maintaining equipment, climbing poles, and performing emergency rescue from the pole and aerial bucket truck.
A lineman climbing a pole corresponds to an office worker taking an elevator to the top floor of a building to his or her office. Climbing is not the job, but you must learn to climb and be at ease when you get there.
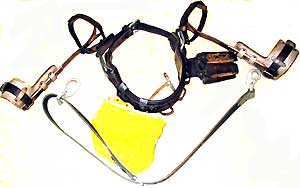
To climb a wooden pole or tree, you will use the equipment shown in figure above.
On the climber, the stirrup fits under the arch of your foot, and the leg iron runs up the inner side of the calf of your leg. This puts the gaff in a position on the inner side of your foot where you can drive it into the pole or tree as you climb.

Two leather straps run through the loop straps and hold the climber tightly against your calf and ankle. The leather pad keeps the upper end of the climber from digging into your leg. The term leather refers not only to treated animal hides but also to neoprene-impregnated nylon products, such as body belts, safety straps, and leg straps. These nonleather items are cleaned with soap and water and are available to the battalions. The safety strap and body belt, are what might be called your extra pair of hands when you work aloft. The safety strap is a leather belt with a tongue type of buckle (keeper snap) at each end. The body belt, strapped around your waist, contains various pockets for small tools. While climbing, you will have the safety strap hanging by both ends from the left ring (called a D ring because of its shape) on the body belt.
The safety strap also has an adjustable buckle that permits varying the length to suit the lineman and circumference of the pole. Care of Climbing Equipment To a lineman the term burning a pole means the highly unpleasant experience of sliding all the way, or a good part of the way, down a pole as a result of defective equipment or some error in climbing techniques made on the way up. The burning you receive does not need to be explained in detail, and besides burning, you may get many splinters. However, climbers, body belt, and safety strap should keep you up where you belong—if you use them properly and take proper care of them. The body belt and safety strap require continuous inspection. Look for the following: Loose or broken rivets - Cracks, cuts, nicks, or tears in leather - Broken or otherwise defective buckles - Defects in safety-belt snap hooks and body-belt D rings - Worn leather - Enlarged tongue holes for belt buckles
If you discover any of these defects, turn in the equipment and replace it. You must periodically perform maintenance work on the leather parts of your climbing equipment. Cleaning comes first. Use a damp sponge and a mild soap. Work up a thick, creamy lather. Then wash the soap off and wipe the belt with a dry cloth. Next, to make the genuine leather soft and pliable, lather well with saddle soap. Work the lather into all parts; then place the belt in the shade to dry. After the lather has nearly dried, rub down the leather with a soft cloth. Both belts and safety straps, made of genuine leather, require oiling about every 6 months. Be sure the leather is clean before applying oil. Use about 2 teaspoonfuls of neat’s-foot oil, working the oil in gradually. Place the belt in a shady place and allow it to dry for 24 hours. Then rub it down with a soft cloth. Always, before you climb a pole or tree, inspect the climbers for the following defects: Broken or loose straps Stirrup worn to a thickness of one-eighth inch or less Length of pole gaff of less than one-fourth inch as measured along the inner surface Length of tree gaff of less than 5 1/2 inches as measured along the outer surface and of less than 3 1/2 inches along the inner surface Difference in gaff lengths of more than one- eighth inch If you find any of these defects, turn in your climbers for a new pair. Climber's Gauge To minimize certain dangers that can occur from neglect of the climbers, make sure you check your gaffs frequently, using a climber's gauge.
 This gauge is used to check the dimensions of the gaffs. These must be within certain tolerances or the climber will "cut out" or lose contact with a pole or tree. Measurements of the length, width, and thickness of the gaffs are made as follows:
LENGTH. Place the lined face of the gauge against the inner surface of the gaff, with the short edge of the gauge held tightly against the crotch (fig. , view A). The crotch is the point where the gaff joins the leg iron of the climber. lf the point of the gaff extends to or beyond the short reference line, the length of the gaff is satisfactory.

WIDTH. Insert the gaff as far as possible through the small slot marked "W," with the inner surface of the gaff resting against the lined face of the gauge (fig. , view B). If the point of the gaff does not extend beyond the long reference line, the width of this section of the gaff is satisfactory. Insert the gaff as far as possible through the large slot marked "W," with the inner surface of the gaff toward the lined face of the gauge (fig. , view C). If the point of the gaff does not extend beyond the far edge of the gauge, the width of this section of the gaff is satisfactory.
THICKNESS. Insert the gaff as far as possible through the small opening marked "TH," with the inner surface of the gaff resting against the lined face of the gauge. If the point of the gaff does not extend beyond the reference line, the thickness of this section of the gaff is satisfactory. Insert the gaff as far as possible through the large opening marked "TH," with the inner surface of the gaff resting against the lined face of the gauge. If the point of the gaff does not extend beyond the far edge of the gauge, the thickness of this section of the gaff is satisfactory. Sharpen dull gaffs by taking long strokes with a file from the heel to the point of the gaff, removing only enough material to make a good point. NEVER USE A GRINDSTONE OR EMERY WHEEL TO
 SHARPEN GAFFS, since the metal may become overheated and lose its strength (temper). Never sharpen the gaff to a needlepoint since it would sink too deeply into the pole and make climbing difficult. Always leave a shoulder about one-eighth inch back from the point. Remember that climbers are for use on poles ONLY. Do not wear them while working on the ground, and do not use the gaffs for such irregular procedures as the opening of cans. Going Up Before you start to climb a pole, there are a number of preliminary steps that you should take. First, of course, make the preclimb inspection of equipment previously described AND PUT ON YOUR HARD HAT.
Then inspect the pole to determine the best side on which to start. This is usually the back, or high side. Get against the pole and grasp each side of it with your hands—not that you will hand support your weight in climbing, but simply because you will use your hands to help in balancing yourself on the climbers. To learn pole climbing, you must practice actual pole climbing. Some pointers that will help you become proficient in pole climbing in minimum time are as follows: Raise your right leg about 8 inches off the ground and sink the gaff on that leg into the pole. Do not jab the gaff in the wood. Allow your weight to sink it in. Now, swing yourself up off the ground and lock your right leg in a stiff-legged position so that all your weight is supported on that leg. At the next step, raise your left foot about 8 inches and sink the gaff on that foot into the wood.
Then swing up onto the left leg, stiff-legged, and take the next step similarly with the right foot. Continue this stepping up and locking stiff-legged until you reach working position.

Keep the upper-part of your body away from the pole; if you were to "hug" the pole, you would tend to throw the gaffs out of the wood When you reach the working position, proceed immediately with great care to attach the safety strap. You should place your feet so that most of the weight is on the right foot, with the right knee locked. The left foot should be slightly above the right foot and the left leg should be slightly bent. Crook your right arm around the pole. Use your left hand to unsnap one end of the safety strap from the left D-ring on the body belt. Holding the end of the safety strap in your left hand, pass it around the back of the pole. Transfer the end of the safety strap from the left hand to the right hand; at the same time, crook your left arm around the pole to hold yourself in position. Then swing the end of the safety strap quickly around with your right hand and snap it onto the right D-ring on the body belt. 4-41
 WARNING Visually check to ensure that the snap hook on the safety strap is hooked on the D-ring and that the keepers on the snap hooks on both ends of the strap are facing away from your body. When you are sure the strap is secure, you may slowly lean back against the safety strap. Coming Down Before starting down the pole, you must release the body belt. Crook your left arm around the pole, and unhook the safety strap from the right D-ring with the right hand. Pass the end of the safety strap to the left hand, crook your right arm around the pole, and snap the end of the safety strap to the left D-ring You are now ready to descend. Break out the left gaff by swinging the left knee out from the side of the pole. Step down with the left foot to a point about 12 inches below the right; stiff-leg the left leg, and bring your weight on it to sink the gaff. Then break out the right gaff by swinging the right knee away from the pole and proceed as formerly with the left leg. Continue this stepping-down process until you have reached the ground. Safety in Pole Climbing Never climb an erected pole until it has been plumbed, backfilled, and tamped. Before going aloft on an old pole, perform a butt rot test on the pole to assure yourself that the pole is strong enough to withstand your weight, and then carefully perform the previously described inspection of the body belt, safety strap, climbers, and other equipment. The body belt contains pockets for small tools. Keeping the tools in these pockets is important. Never use the center loop in the body belt for carrying a tool, however. In case of a fall, the tool may injure your tailbone. If you try to climb with tools in your hands, your own balance on the pole will be unsafe, and you could drop tools on someone below. The safety strap is used to secure you to the pole, leaving your hands free to work. As you go up, the safety strap is always fastened to a single D-ring on the body belt. For a right-handed person, it is carried on the left D-ring. Never use an improvised safety strap, or one that has been lengthened by the addition of rope or wire. Never attach the strap to pins or to crossarm braces. Never put the safety strap around the pole above the highest crossarm if the length of the pole above the crossarm is short. The strap should never be less than 1 foot below the top of the pole. Never wear climbers except for climbing. Be careful not to gaff yourself or anybody else.
or she
ensure
Never
one mended with
performing
PROVIDE FOR PERSONAL PROTECTION.

Monday, May 11, 2009
Practice caution when driving in construction zones
Spring is construction season in Florida, and I595 is just one of the areas that will get a long-anticipated face lift.
But the I595 project is just one of many that will occur throughout the area this summer, and it's important for drivers to keep alert for the construction zones and help everyone stay safe.
Simply put, when you see the construction zone signs, slow down.
It's not about the doubled fine if you are busted for speeding in a construction zone, although that might be a good deterrent. A few bucks might hurt for a little while, but it's a short-term pain that hopefully results in a change of behavior.
The biggest deterrent should be the potential injury and death your vehicle could cause if an unfortunate accident should occur. Among the potential charges you could face are, in the event of a death: involuntary manslaughter, aggravated vehicular homicide, vehicular homicide and others. If serious injury occurs, aggravated vehicular assault could be your charge.
Deaths and injuries among highway workers and others in construction work zones on U.S. highways represent a growing problem, according to the Federal Highway Administration. In 2007, 835 deaths were reported in construction zones in the U.S.
So, slow down and watch out in construction zones. The life you save might be your own - and someone else's.
Friday, May 8, 2009
Thursday, April 30, 2009
May is National Electric Safety Month
Every 30 minutes a worker is hurt due to electrical hazards!
Recovery from electrical shocks and burns is slow, painful and costly. You can choose to be safe and bring down this statistic with a few helpful hints from the Electrical Safety Foundation International:
Deenergize - Deenergize - Deenergize
Power down whenever possible. Working on energized equipment greatly increases your risk of injury or death.
Lockout/Tagout
Follow the key principles of your lockout/tagout program.
Arc Flash prevention and PPE
In the blink of an eye, an arc flash can forever change your life. Protect yourself with Arc Flash knowledge and the right PPE.
Job planning and work permits
Assess the hazards and define the tasks each job will ential. Never work energized unless it is absolutely necessary

Thursday, April 23, 2009
It's time to prepare for the Florida Summer!

Heat stress can be a serious problem in hot working environments. The core body temperature for a human must be maintained within a very narrow range, regardless of work load or adverse environmental conditions. An increase in core body temperature of 6.5 F above normal can result in death. The body initially responds to heat by sweating and by circulating blood closer to the skin's surface to lower the main body temperature. When exposure to heat takes place over an extended period, a process of physiological adaptation called acclimatization occurs. Acclimatization may take weeks, although significant adaptation occurs within a few days of the first exposure. Once acclimatization is achieved, working in the heat results in increased production of a more dilute sweat and less of an increase in heart rate and body temperature.


Tuesday, April 21, 2009

Tuesday, April 14, 2009
Shocking surprise

Shocking Surprise - The crew was informed that the wires were "dead"...
how to: pole top rescue
Here is the correct way to do it.
Monday, April 13, 2009
Ladder Safety

Don't EVER use a damaged ladder, aluminum ladders for electrical work and Never, ever try to "walk" a ladder.
Thursday, April 9, 2009

Tuesday, April 7, 2009
April is Safe Digging Month in Florida
Spring is officially upon us, and Gov. Charlie Crist has designated April as Safe Digging Month! Eager homeowners, like you, are finally able to dust off the shovel and get started on those outdoor improvement projects. Before you move that first bit of dirt, remember to call 811. Safe Digging Month was designated to remind Florida residents that our land is made up of a complex underground infrastructure of pipelines, wires and cables. Striking an underground utility line while digging can cause harm to you or those around you, disrupt service to an entire neighborhood, and potentially result in fines and repair costs. A call must be placed to 811 before every digging project, from simple landscaping projects like planting trees or shrubs, to building a deck or installing a mailbox. Failure to call before digging results in more than 200,000 unintentional hits annually across the nation. Don't become part of the statistic - make sure to call! Here's how it works: -- One free, simple phone call to 811 makes it easy for Sunshine State One Call to notify all appropriate utility companies of your intent to dig. -- Call at least two full business days prior to digging to ensure enough time for utility lines to be properly marked. -- When you call 811, a representative from SSOCOF will ask for the location and description of your digging project. -- SSOCOF will notify affected utility companies, who will then send a professional locator to the proposed dig site to mark the approximate location of your lines. -- Once lines have been properly marked, roll up those sleeves and carefully dig around the marked areas. Keep in mind that the underground utilities can be anywhere within 24-inches of the marks.
.


.
Thursday, April 2, 2009

Wednesday, April 1, 2009
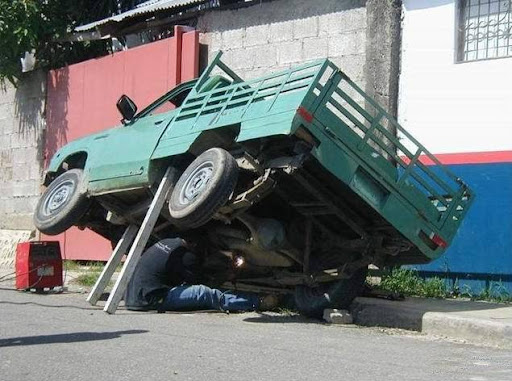
Tuesday, March 31, 2009

Only the begining
Safety is only achieved when there is commitment, participation, involvement and dedication.
This blog is another way to share information, ideas, comments, etc, with the intention to spread the Safety culture using every available channel.
If you have an idea, suggestion, anything that you think it would be of use for this blog, PLEASE share with me and I'll post it.
Sincerely

This blog is another way to share information, ideas, comments, etc, with the intention to spread the Safety culture using every available channel.
If you have an idea, suggestion, anything that you think it would be of use for this blog, PLEASE share with me and I'll post it.
Sincerely
Subscribe to:
Comments (Atom)